
写真 房総半島南部(千葉県いすみ市)に伊勢海老を食べに行く旅行女子
前回までの講座では、EXCEL XLL SDK付属のサンプルソースコードをVisual StudioのC++コンパイラを使ってコンパイルし、生成したXLLアドインを無事にEXCELに読み込んで実行するところまでを紹介した。皆さん、無事に出来ましたでしょうか?
Excel 2013 XLL ソフトウェア開発キット (SDK)はこちら。

さて、問題はここからだ。
EXCEL VBAやCOMアドイン(= VSTOアドイン)なら、セルのデータを読み書きするなんてのはとても簡単だ。
ところがXLLアドインを使って同じようにEXCELのセルのデータを読み書きしたいのだが、どんな風にやれば良いのかさっぱり分からない。
で、ワテの場合、数年前にXLLアドイン開発に猛烈に熱中していたのだが、必死でネット検索して XLLアドインを使ってEXCELのセルデータの扱い方を調べたのだが、サンプルプログラムのようなものすら全く見付からないのだ。
EXCEL VBAやEXCEL VSTOアドインのサンプルなら、沢山見付かるのに。
XLLアドインってそんなに人気無いのかな?
XLLアドインってそんなに作るのが難しいのかな?
兎に角、全くヒットしないのだ。
XLL開発に関する情報が世間に漏れるとマイクロソフト社が困るのか?
それでXLL関連情報は極秘にされているのか?
などと疑念を抱くくらいに情報が無いのだ。
XLLアドインに付いて解説した書籍すら殆ど見付からない。
唯一見付けたXLL関連の書籍がこれだ。


付録のCD-ROMにあるサンプルプログラムが役立った。
ワテはこの本を必死で解読すると同時に、EXCEL SDKのサンプルを良く分からないまま試行錯誤で書き換えて応用しながら各種の実験を行い、どうにか自力でEXCELのセルデータを読み書きするXLLを作成出来るようになるまで一ケ月以上掛かったと思う。
当記事では、XLLアドインを開発してみたいと思っている全世界推定10万人くらいのXLLアドインファンの皆さんの為に、ワテが苦難の末に実現出来たXLLアドインを使ってEXCELのセルデータを扱う方法を解説してみたい。
では、本題に入ろう。


EXCEL SDKのGENERICサンプルCソースコードを理解する
まず初めに、EXCELのリボンに独自のメニュー項目を追加して、そのメニューを実行するとセルに値を書き出すサンプルを作ってみよう。
その為に、まずは前回までにビルドに成功しているEXCEL SDKに入っているGENERICと言うサンプルCコードを流用して使う事にする。
なお、ワテの理解では、Visual Studioはファイルの拡張子が.cならC言語ソースとして扱い、.cppならC++ソースとして扱うと思う。
SDKサンプルには三つのプロジェクトがあるが、それらは以下に示すように拡張子に .c や .cpp が混在していてややこしい。
| ヘッダー | ソースコード | |
| Exampleプロジェクト | EXAMPLE.C | |
| Frameworkプロジェクト |
FRAMEWRK.H memorymanager.h MemoryPool.h |
FRAMEWRK.c MemoryManager.cpp MemoryPool.cpp |
| GENERICプロジェクト |
GENERIC.H |
GENERIC.C |
まあ、気になる人は全部 .cpp に統一するなどしても良いだろう。
ワテの場合は、FrameworkプロジェクトはSDKで使う共通ライブラリのようなものなので、そのまま何も変更せずに使う事にした。
一方、これから作成する新プロジェクトはGENERICプロジェクトなどを流用して作る予定なのだが、GENERICプロジェクトは上表のように拡張子は .H や .C になっている。それだとややこしいので、今後作成する新プロジェクトは全て .cpp や .hpp に統一する事にした。
まあその辺りは好き好きだが。
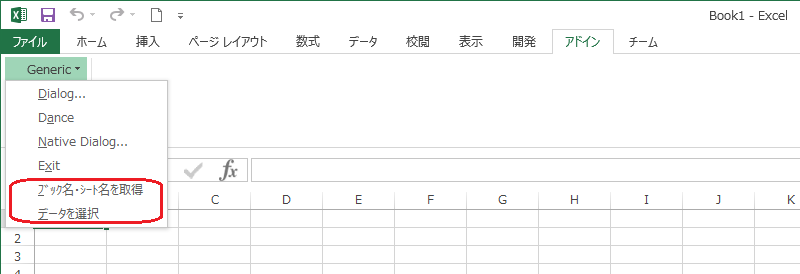
GENERICサンプルのメニューの例
GENERICサンプルをビルドして生成されるGENERIC.xllをEXCEL 2013(32bit)にロードするとアドインタブにGenericと言うメニューが追加される(下図)。
そのGenericプルダウンメニューを開くと四つのサブメニューがある。

興味ある人はそれぞれ実行してみると良いだろう。
例えばDanceを実行すると、A1~D1までの四つのセルが順番にアクティブになって行く。ESCキー押下で停止する。

Danceは実用性の無いデモプログラムであるが、その部分のソースコードを見れば、特定のセルを選択する方法が分るので勉強になる。
DanceメニューのCソースコード
///***************************************************************************
// fDance()
//
// Purpose:
//
//      This is an example of a lengthy operation. It calls the function xlAbort
//      occasionally. This yields the processor (allowing cooperative
//      multitasking), and checks if the user has pressed ESC to abort this
//      operation. If so, it offers the user a chance to cancel the abort.
//
// Parameters:
//
// Returns:
//
//      int         1
//
// Comments:
//
// History:  Date       Author        Reason
///***************************************************************************

__declspec(dllexport) int WINAPI fDance(void)
{
	DWORD dtickStart;
	XLOPER12 xAbort, xConfirm;
	int boolSheet;
	int col=0;
	XCHAR rgch[32];

	//
	// Check what kind of sheet is active. If it is a worksheet or macro
	// sheet, this function will move the selection in a loop to show
	// activity. In any case, it will update the status bar with a countdown.
	//
	// Call xlSheetId; if that fails the current sheet is not a macro sheet or
	// worksheet. Next, get the time at which to start. Then start a while
	// loop that will run for one minute. During the while loop, check if the
	// user has pressed ESC. If true, confirm the abort. If the abort is
	// confirmed, clear the message bar and return; if the abort is not
	// confirmed, clear the abort state and continue. After checking for an
	// abort, move the active cell if on a worksheet or macro. Then
	// update the status bar with the time remaining.
	//
	// This block uses TempActiveCell12(), which creates a temporary XLOPER12.
	// The XLOPER12 contains a reference to a single cell on the active sheet.
	// This function is part of the framework library.
	//

	boolSheet = (Excel12f(xlSheetId, 0, 0) == xlretSuccess);

	dtickStart = GetTickCount();

	while (GetTickCount() < dtickStart + 60000L)
	{
		Excel12f(xlAbort, &xAbort, 0);
		if (xAbort.val.xbool)
		{
			Excel12f(xlcAlert, &xConfirm, 2,
				  TempStr12(L"Are you sure you want to cancel this operation?"),
				  TempNum12(1));
			if (xConfirm.val.xbool)
			{
				Excel12f(xlcMessage, 0, 1, TempBool12(0));
				return 1;
			}
			else
			{
				Excel12f(xlAbort, 0, 1, TempBool12(0));
			}
		}

		if (boolSheet)
		{
			Excel12f(xlcSelect, 0, 1, TempActiveCell12(0,(BYTE)col));
			col = (col + 1) & 3;
		}

		wsprintfW(rgch,L"0:%lu",
				 (60000 + dtickStart - GetTickCount()) / 1000L);

		Excel12f(xlcMessage, 0, 2, TempBool12(1), TempStr12(rgch));

	}

	Excel12f(xlcMessage, 0, 1, TempBool12(0));

	return 1;
}
コード DanceメニューのCソースコード(fDance関数)
まあ、当初はワテはこのコードを見てもwhileループでグルグル回っていると言う事くらいしか分からなかった。
TempStr12()、TempActiveCell12()、Excel12f()など、なんのこっちゃさっぱり分からない。
これらの関数はFrameworkプロジェクトのFRAMEWRK.cファイルにある。
TempStr12()とは何か?
まずは関数TempStr12()のCソースコードを見てみよう。
///***************************************************************************
// TempStr12()
//
// Purpose:
//      Creates a temporary string XLOPER12 from a
//      unicode const string with a local copy in
//      temp memory
//
// Parameters:
//
//      XCHAR lpstr     The string, as a null-terminated
//                      unicode string. This function will
//                      count the bytes of the string
//                      and insert that count in the
//                      first byte of the temp string.
//
// Returns:
//
//      LPXLOPER12      The temporary XLOPER12, or 0
//                      if GetTempMemory() failed.
//
// Comments:
//
//      (1) Fix for const string pointers being passed in to TempStr.
//          Note it assumes NO leading space
//
//      (2) Also note that XLOPER12 now uses unicode for the string
//          operators
//
//      (3) Will remove the null-termination on the string
//
//
//
// Note: TempStr12 is different from TempStr and is more like TempStrConst
// in its behavior. We have consciously made this choice and deprecated the
// behavior of TempStr going forward. Refer to the note in comment section
// for TempStr to better understand this design decision.
///***************************************************************************

LPXLOPER12 TempStr12(const XCHAR* lpstr)
{
	LPXLOPER12 lpx;
	XCHAR* lps;
	int len;

	len = lstrlenW(lpstr);

	lpx = (LPXLOPER12) GetTempMemory(sizeof(XLOPER12) + (len+1)*2);

	if (!lpx)
	{
		return 0;
	}

	lps = (XCHAR*)((CHAR*)lpx + sizeof(XLOPER12));

	lps[0] = (BYTE)len;
	//can't wcscpy_s because of removal of null-termination
	wmemcpy_s( lps+1, len+1, lpstr, len);
	lpx->xltype = xltypeStr;
	lpx->val.str = lps;

	return lpx;
}
まあ要するに、コメントの // Purpose: のところに書いてあるように、この関数
LPXLOPER12 TempStr12(const XCHAR* lpstr)
は、入力引数 const XCHAR* lpstr で与えられたワイド文字型ポインタのデータを使って、EXCEL XLL特有のXLOPER12と言う構造体の中に、一時的な文字列データ(temporary string)を生成するのだ。
一時的な文字列とはどう言う意味かと言うと、FRAMEWRKプロジェクトの中には、
MemoryManager.cpp
MemoryPool.cpp
などと言った何らかのメモリー管理を連想させる名前のソースファイルやヘッダーファイルが定義されているが、これらは何をするのかと言うと、ワテの理解では以下の通り。
つまり、XLLアドインが使う作業領域をメモリー上に確保しておくのだ。
EXCELにXLLアドインがロードされた時点で作業用メモリー領域を確保しておき、アンロードされた時点で解放する。領域のサイズなどは MemoryPool.h ヘッダーファイルで定義されている。
そのように事前に確保してあるメモリー領域にTempStr12()などの関数はデータをLOPER12構造体として一時的に書き込んで、そのアドレスをLPXLOPER12型でリターンするのだ。そのメモリー領域はTempXXX()と命名されている関数たちがコールされる度に上書きされる。
MemoryManager.cppの先頭付近でグローバル変数でこんな定義がある。
//
// Singleton instance of the class
//
MemoryManager* vpmm;
確保した作業用メモリー領域の先頭アドレスをこのグローバルなポインタ変数に入れてTempXXX()関数の処理で使っている。まあ、グローバル変数が嫌いな人には多少抵抗がある手法かも知れないが、ワテは全く気にならない。
プログラムなんて動けばいいのだから。
XCHAR* 型とは何か?
INCLUDE\XLCALL.H ヘッダーファイルの中で以下の定義がある。
typedef WCHAR XCHAR; /* Wide Character */
そのWCHARは、winnt.hの中で以下のように定義されている。
typedef wchar_t WCHAR; // wc, 16-bit UNICODE character
と言う事で、XCHARはwchar_tと同じでワイド文字型になる。
なので、TempStr12()の入力引数 lpstr は const wchar_t型のポインタだ。
XLOPER12、LPXLOPER12とは何か?
一方、戻り値はLPXLOPER12と言う見慣れぬ型であるが、これは同じくINCLUDE\XLCALL.H ヘッダーファイルの中で以下の定義がある。
/*
** XLOPER12 structure
**
** Excel 12's fundamental data type: can hold data
** of any type. Use "U" as the argument type in the
** REGISTER function.
**/

typedef struct xloper12
{
	union
	{
		double num;				       	/* xltypeNum */
		XCHAR *str;				       	/* xltypeStr */
		BOOL xbool;				       	/* xltypeBool */
		int err;				       	/* xltypeErr */
		int w;
		struct
		{
			WORD count;			       	/* always = 1 */
			XLREF12 ref;
		} sref;						/* xltypeSRef */
		struct
		{
			XLMREF12 *lpmref;
			IDSHEET idSheet;
		} mref;						/* xltypeRef */
		struct
		{
			struct xloper12 *lparray;
			RW rows;
			COL columns;
		} array;					/* xltypeMulti */
		struct
		{
			union
			{
				int level;			/* xlflowRestart */
				int tbctrl;			/* xlflowPause */
				IDSHEET idSheet;		/* xlflowGoto */
			} valflow;
			RW rw;				       	/* xlflowGoto */
			COL col;			       	/* xlflowGoto */
			BYTE xlflow;
		} flow;						/* xltypeFlow */
		struct
		{
			union
			{
				BYTE *lpbData;			/* data passed to XL */
				HANDLE hdata;			/* data returned from XL */
			} h;
			long cbData;
		} bigdata;					/* xltypeBigData */
	} val;
	DWORD xltype;
} XLOPER12, *LPXLOPER12;
コード XLL開発で標準的に使われるXLOPER12構造体定義(INCLUDE\XLCALL.H )
XLOPER12が構造体(structure)で、LPXLOPER12がそのポインタ型。
構造体XLOPER12の中に共用体(union)valの定義が入っている。その中にさらに構造体 sref, mref, array, flow, bigdataが入っていている。
これを見ても何のこっちゃさっぱり分からないだろう。ワテも全く分からなかった!
この構造体は何に使うのかと言うと、様々な用途に使うのだが、当記事では以下の二種類の用途に使う。
- セル選択域の行と列の座標を取得する(単一矩形領域、複数矩形領域など)
- セル選択域のデータを読み取る(選択域のセルデータを数値、文字列などで取り出す)
それ以外にも、色んな用途に使うのだがここには書き切れない。
EXCELのリボンに独自メニューを追加する
さて、GENERICサンプルを応用してEXCELのリボンに独自メニューを追加してみよう。
まず、GENERICサンプルプロジェクトをキーワード fDance で検索すると、メニューを定義していると思われるコードが三か所見付かった。
g_rgCommandFuncs, g_rgMenu, g_rgToolの三つの配列変数だ。
GENERICサンプルのリボンに表示するプルダウンメニュー項目
//
// g_rgCommandFuncs
//
// This is a table of all the command functions exported by this module.
// These functions are all registered (in xlAutoOpen) when you
// open the XLL. Before every string, leave a space for the
// byte count. The format of this table is the same as
// arguments two through eight of the REGISTER function.
// g_rgFuncsRows define the number of rows in the table. The
// g_rgCommandFuncsCols represents the number of columns in the table.
//
#define g_rgCommandFuncsRows 4
#define g_rgCommandFuncsCols 7

static LPWSTR g_rgCommandFuncs[g_rgCommandFuncsRows][g_rgCommandFuncsCols] =
{
	{ L"fDialog",                   // Procedure
		L"A",                   // type_text
		L"fDialog",             // function_text
		L"",                    // argument_text
		L"2",                   // macro_type
		L"Generic Add-In",      // category
		L"l"                    // shortcut_text
	},
	{ L"fDance",
		L"A",
		L"fDance",
		L"",
		L"2",
		L"Generic Add-In",
		L"m"
	},
	{ L"fShowDialog",
		L"A",
		L"fShowDialog",
		L"",
		L"2",
		L"Generic Add-In",
		L"n"},
	{ L"fExit",
		L"A",
		L"fExit",
		L"",
		L"2",
		L"Generic Add-In",
		L"o"
	},
};
コード g_rgCommandFuncs二次元配列の定義(GENERIC.C)
//
// g_rgMenu
//
// This is a table describing the Generic drop-down menu. It is in
// the same format as the Microsoft Excel macro language menu tables.
// The first column contains the name of the menu or command, the
// second column contains the function to be executed, the third
// column contains the (Macintosh only) shortcut key, the fourth
// column contains the help text for the status bar, and
// the fifth column contains the help text index. Leave a space
// before every string so the byte count can be inserted. g_rgMenuRows
// defines the number of menu items. 5 represents the number of
// columns in the table.
//

#define g_rgMenuRows 5
#define g_rgMenuCols 5

static LPWSTR g_rgMenu[g_rgMenuRows][g_rgMenuCols] =
{
	{L"&Generic",          L"",            L"",
		L"The Generic XLL Add-In",         	L""},
	{L"&Dialog...",        L"fDialog",     L"",
		L"Run a sample generic dialog",    	L""},
	{L"D&ance",            L"fDance",      L"",
		L"Make the selection dance around",	L""},
	{L"&Native Dialog...", L"fShowDialog", L"",
		L"Run a sample native dialog",     	L""},
	{L"E&xit",             L"fExit",       L"",
		L"Close the Generic XLL",          	L""},
};
コード g_rgMenu二次元配列の定義(GENERIC.C)
//
// g_rgTool
//
// This is a table describing the toolbar. It is in the same format
// as the Microsoft Excel macro language toolbar tables. The first column
// contains the ID of the tool, the second column contains the function
// to be executed, the third column contains a logical value specifying
// the default image of the tool, the fourth column contains a logical
// value specifying whether the tool can be used, the fifth column contains
// a face for the tool, the sixth column contains the help_text that
// is displayed in the status bar, the seventh column contains the Balloon
// text (Macintosh Only), and the eighth column contains the help topics
// as quoted text. Leave a space before every string so the byte count
// can be inserted. g_rgToolRows defines the number of tools on the toolbar.
// 8 represents the number of columns in the table.
//

#define g_rgToolRows 3
#define g_rgToolCols 8

static LPWSTR g_rgTool[g_rgToolRows][g_rgToolCols] =
{
	{L"211", L"fDance", L"FALSE", L"TRUE", L"", L"Dance the Selection", L"", L""},
	{L"0",   L"",       L"",      L"",     L"", L"",                    L"", L""},
	{L"212", L"fExit",  L"FALSE", L"TRUE", L"", L"Exit this example",   L"", L""},
};
コード g_rgTool二次元配列の定義(GENERIC.C)
さて、ワテの場合は英語が苦手なのでこれらのコードに書いてある英文のコメントは読んでいない。
で、適当に変更してみたら無事に自前のサブメニュー項目を二個追加出来た。
以下では、どのようにGENERICサンプルを変更したのかを解説しよう。
独自のメニュー項目を追加してみる
g_rgCommandFuncs, g_rgMenuの二つの配列変数の行(ROW)を二個増やして、自前のサブメニュー項目を追加しただけだが。
三番目のg_rgTool配列は変更していない。
また、沢山あるパラメータの意味は理解出来ていない。
//
// g_rgCommandFuncs
//
// This is a table of all the command functions exported by this module.
// These functions are all registered (in xlAutoOpen) when you
// open the XLL. Before every string, leave a space for the
// byte count. The format of this table is the same as
// arguments two through eight of the REGISTER function.
// g_rgFuncsRows define the number of rows in the table. The
// g_rgCommandFuncsCols represents the number of columns in the table.
//
#define g_rgCommandFuncsRows 6//4
#define g_rgCommandFuncsCols 7

const extern __declspec(selectany) /*static*/ /*LPWSTR*/LPCWSTR g_rgCommandFuncs[g_rgCommandFuncsRows][g_rgCommandFuncsCols] =
{
	{ L"fDialog",                   // Procedure
		L"A",                   // type_text
		L"fDialog",             // function_text
		L"",                    // argument_text
		L"2",                   // macro_type
		L"Generic Add-In",      // category
		L"l"                    // shortcut_text
	},
	{ L"fDance",
		L"A",
		L"fDance",
		L"",
		L"2",
		L"Generic Add-In",
		L"m"
	},
	{ L"fShowDialog",
		L"A",
		L"fShowDialog",
		L"",
		L"2",
		L"Generic Add-In",
		L"n"},
	{ L"fExit",
		L"A",
		L"fExit",
		L"",
		L"2",
		L"Generic Add-In",
		L"o"
	},
	{ L"list_bookname_sheetnames_all",
		L"A",
		L"list_bookname_sheetnames_all",
		L"",
		L"2",
		L"Generic Add-In",
		L"o"
	},
	{ L"select_all_data_on_activesheet",
		L"A",
		L"select_all_data_on_activesheet",
		L"",
		L"2",
		L"Generic Add-In",
		L"o"
	}
};

//
// g_rgMenu
//
// This is a table describing the Generic drop-down menu. It is in
// the same format as the Microsoft Excel macro language menu tables.
// The first column contains the name of the menu or command, the
// second column contains the function to be executed, the third
// column contains the (Macintosh only) shortcut key, the fourth
// column contains the help text for the status bar, and
// the fifth column contains the help text index. Leave a space
// before every string so the byte count can be inserted. g_rgMenuRows
// defines the number of menu items. 5 represents the number of
// columns in the table.
//

#define g_rgMenuRows 7//5
#define g_rgMenuCols 5

const extern __declspec(selectany) /*static*/ /*LPWSTR*/LPCWSTR g_rgMenu[g_rgMenuRows][g_rgMenuCols] =
{
	{L"&Generic",          L"",            L"",
		L"The Generic XLL Add-In",         	L""},
	{L"&Dialog...",        L"fDialog",     L"",
		L"Run a sample generic dialog",    	L""},
	{L"D&ance",            L"fDance",      L"",
		L"Make the selection dance around",	L""},
	{L"&Native Dialog...", L"fShowDialog", L"",
		L"Run a sample native dialog",     	L""},
	{L"E&xit",             L"fExit",       L"",
		L"Close the Generic XLL",          	L""},
	{L"&ブック名・シート名を取得",           L"list_bookname_sheetnames_all",       L"",
		L"Close the Generic XLL",          	L""},
	{L"&データを選択",					L"select_all_data_on_activesheet",       L"",
		L"Close the Generic XLL",          	L""},
};

//
// g_rgTool
//
// This is a table describing the toolbar. It is in the same format
// as the Microsoft Excel macro language toolbar tables. The first column
// contains the ID of the tool, the second column contains the function
// to be executed, the third column contains a logical value specifying
// the default image of the tool, the fourth column contains a logical
// value specifying whether the tool can be used, the fifth column contains
// a face for the tool, the sixth column contains the help_text that
// is displayed in the status bar, the seventh column contains the Balloon
// text (Macintosh Only), and the eighth column contains the help topics
// as quoted text. Leave a space before every string so the byte count
// can be inserted. g_rgToolRows defines the number of tools on the toolbar.
// 8 represents the number of columns in the table.
//
コード GENERICサンプルのメニューにサブメニュー項目を二つ追加する例
なお、配列変数の宣言に於いて、オリジナルは
static LPWSTR g_rgCommandFuncs[g_rgCommandFuncsRows][g_rgCommandFuncsCols] =
であるが、ワテの追加版では、
const extern __declspec(selectany) /*static*/ /*LPWSTR*/LPCWSTR g_rgCommandFuncs[g_rgCommandFuncsRows][g_rgCommandFuncsCols] =
などとなっている。
これは深い意味はない。
単にオリジナルGENERICサンプルではGENERIC.Cファイルにこれらの定義があったが、ワテの場合はこの配列宣言を xxx.hppのようなヘッダーファイルに分離したのでこんな風に書き換えただけだ。
また、配列データの中身を書き換える事は無いのでオリジナルのLPWSTR型を定数型のLPCWSTR型に変えただけなのだ。
まあその辺りは皆さん自由にすると良いだろう。
サブメニューから実行される関数を作る
二つの関数を作成する。
| list_bookname_sheetnames_all() | 現在のブックにあるシート名を全て取得してアクティブシートに書き出す関数(次回説明予定) |
| select_all_data_on_activesheet() | アクティブシート上のデータ領域を選択する関数 |
二つの関数を作成予定だが、当記事では二番目の関数select_all_data_on_activesheet()を作成する。
まあ、VBAで言えば、使用されているセル範囲選択ならこんな感じか。
 Sub Select_UsedRange()


    'アクティブシートの使用されているセル範囲を全選択
    ActiveSheet.UsedRange.Select

    'アクティブシートの使用されているセル範囲アドレスを表示
    MsgBox ActiveSheet.UsedRange.Address


End Sub
これと同等の機能をXLLのC++関数で作成するのだ。
アクティブシート上のデータ域を矩形選択するXLLのC++コード例
GENERICサンプルなどを応用して作ってみた。
bool isExistDocument()
{
	// 一つでもBookが開いていればtrue、無い場合はfalse。

	XLOPER12 xResult;
	int rc = Excel12f(xlfGetDocument, &xResult, 1, TempInt12(13));	// 13 The number of windows that the sheet is displayed with.(P295)
	UNREFERENCED_PARAMETER(rc);
	switch (xResult.xltype)
	{
	case xltypeNum:
		if (xResult.val.num > 0)
			return true;
		else
			return false;
		break;
	case xltypeErr:
		return false;
		break;
	default:
		return false;
		break;
	}
}

__declspec(dllexport) int WINAPI select_all_data_on_activesheet(void)
{
	XLOPER12 xResult;
	int rc;
	int rowS;
	int rowE;
	int colS;
	int colE;
	bool f_exist = isExistDocument();
	if (!f_exist) {
		return xlretSuccess;	// ブックが無い場合に本関数でデータ選択しようとした場合は、何もせずにリターン。成功したことにする。要検討。
	}
	rc = Excel12f(xlfGetDocument, &xResult, 1, TempInt12(9)); rowS = (int)xResult.val.num;	// 9 The first used row or 0 if the sheet is empty. (Counts from 1.)
	rc = Excel12f(xlfGetDocument, &xResult, 1, TempInt12(10)); rowE = (int)xResult.val.num;	// 10 The last used row or 0 if the sheet is empty. (Counts from 1.)
	rc = Excel12f(xlfGetDocument, &xResult, 1, TempInt12(11)); colS = (int)xResult.val.num;	// 11 The first used column or 0 if the sheet is empty. (Counts from 1.)
	rc = Excel12f(xlfGetDocument, &xResult, 1, TempInt12(12)); colE = (int)xResult.val.num;	// 12 The last used column or 0 if the sheet is empty. (Counts from 1.)
	long long area = (long long)rowS * (long long)rowE * (long long)colS * (long long)colE;
	if (area == 0) {	// シートにデータ無い場合はこれらの数字が0なので、その場合は(1,1)セルを選択して、選択解除とする。
		rowS = rowE = colS = colE = 1;
	}
	rc = Excel12f(xlcSelect, 0, 1, TempActiveRef12(rowS - 1, rowE - 1, colS - 1, colE - 1));

	return rc;
}
まあ、関数名、変数名その他、突っ込みどころが多いとは思うが気にしないで頂きたい。
select_all_data_on_activesheet(void)を実行してみる
作成したXLLアドインをEXCEL 2013(32bit)に読み込んで実行する様子を動画にキャプチャしてみた。
どうでしょうか?
皆さんも無事に同じ事が出来たでしょうか?
select_all_data_on_activesheet(void)関数の解説
select_all_data_on_activesheet(void)関数内では、isExistDocument()をコールしてブックにシートがあるかどうか判定している。
その判定では、以下のようにExcel12f()関数を実行している。
int rc = Excel12f(xlfGetDocument, &xResult, 1, TempInt12(13)); // 13 The number of windows that the sheet is displayed with.(P295)
ここで、第四引数にはTempInt12(13)を与えているが、これはコメントにあるように”シートが表示されているWindowの数”と言う事だ。ええっと、例えば普通にBookを一個だけ開いてシートが一つ以上ある場合は、1が得られる。もしBookを複数開いている場合には、1より大きな値が帰る。
いずれにしても1以上の値が帰れば少なくとも一つのアクティブシートがあると言う事が分るので、次に進んで以下の処理を行う。
この処理では、コメントにあるようにUsedRangeの左上rowを取得している。
 rc = Excel12f(xlfGetDocument, &xResult, 1, TempInt12(9));
 rowS = (int)xResult.val.num; // 9 The first used row or 0 if the sheet is empty. (Counts from 1.)
同様に、UsedRangeの右下row, 左上col, 右下colも取得している。
この場合もExcel12f()を実行している。
では、Excel12f()を見てみよう。
Excel12f()とは何か?
FRAMEWRK.cの中にExcel12f()は実装されている。
///***************************************************************************
// Excel12f()
//
// Purpose:
//      A fancy wrapper for the Excel12() function. It also
//      does the following:
//
//      (1) Checks that none of the LPXLOPER12 arguments are 0,
//          which would indicate that creating a temporary XLOPER12
//          has failed. In this case, it doesn't call Excel12
//          but it does print a debug message.
//      (2) If an error occurs while calling Excel12,
//          print a useful debug message.
//      (3) When done, free all temporary memory.
//
//      #1 and #2 require _DEBUG to be defined.
//
// Parameters:
//
//      int xlfn            Function number (xl...) to call
//      LPXLOPER12 pxResult Pointer to a place to stuff the result,
//                          or 0 if you don't care about the result.
//      int count           Number of arguments
//      ...                 (all LPXLOPER12s) - the arguments.
//
// Returns:
//
//      A return code (Some of the xlret... values, as defined
//      in XLCALL.H, OR'ed together).
//
// Comments:
//
///***************************************************************************

int cdecl Excel12f(int xlfn, LPXLOPER12 pxResult, int count, ...)
{
	int xlret;
	va_list ppxArgs;

#ifdef _DEBUG
	LPXLOPER12 px;
	int i;

	va_start(ppxArgs, count);

	for (i=0; i<count; i++)
	{
		px = va_arg(ppxArgs, LPXLOPER12);

		if (px == NULL)
		{
			debugPrintf("Error! A zero parameter is being passed "
						"to Excel12f. Check memory...\r");
			FreeAllTempMemory();
			return xlretFailed;
		}
	}

	va_end(ppxArgs);

#endif /* DEBUG */

	va_start(ppxArgs, count);
	xlret = Excel12v(xlfn,pxResult,count,(LPXLOPER12 *)ppxArgs);
	va_end(ppxArgs);

#ifdef _DEBUG

	if (xlret != xlretSuccess)
	{
		debugPrintf("Error! Excel12(");

		if (xlfn & xlCommand)
			debugPrintf("xlCommand | ");
		if (xlfn & xlSpecial)
			debugPrintf("xlSpecial | ");
		if (xlfn & xlIntl)
			debugPrintf("xlIntl | ");
		if (xlfn & xlPrompt)
			debugPrintf("xlPrompt | ");

		debugPrintf("%u) callback failed:",xlfn & 0x0FFF);

		/* More than one error bit may be on */

		if (xlret & xlretAbort)
		{
			debugPrintf(" Macro Halted\r");
		}

		if (xlret & xlretInvXlfn)
		{
			debugPrintf(" Invalid Function Number\r");
		}

		if (xlret & xlretInvCount)
		{
			debugPrintf(" Invalid Number of Arguments\r");
		}

		if (xlret & xlretInvXloper)
		{
			debugPrintf(" Invalid XLOPER12\r");
		}

		if (xlret & xlretStackOvfl)
		{
			debugPrintf(" Stack Overflow\r");
		}

		if (xlret & xlretFailed)
		{
			debugPrintf(" Command failed\r");
		}

		if (xlret & xlretUncalced)
		{
			debugPrintf(" Uncalced cell\r");
		}

	}

#endif /* DEBUG */

	FreeAllTempMemory();

	return xlret;
}
コード Excel12f関数(FRAMEWRK.c)
えっと、英文コメントは各自読んで頂くとして、まあ、簡単に言えばExcel12f()はさらに別のExcel12v()をコールしている。
つまりまあラッパー(wrapper)関数なのだ。
で、Excel12v()を見てみよう。
Excel12v()とは何か?
Excel12v()関数は、SRC/XLCALL.CPP で実装されている。
int pascal Excel12v(int xlfn, LPXLOPER12 operRes, int count, LPXLOPER12 opers[])
{

	int mdRet;

	FetchExcel12EntryPt();
	if (pexcel12 == NULL)
	{
		mdRet = xlretFailed;
	}
	else
	{
		mdRet = (pexcel12)(xlfn, count, &opers[0], operRes);
	}
	return(mdRet);

}
コード Excel12v関数(SRC/XLCALL.CPP)
このExcel12v()の中から、さらに以下の関数を実行する事で目的とする情報を得ているのだ。
mdRet = (pexcel12)(xlfn, count, &opers[0], operRes);
この関数は LIB/XLCALL32.LIB に実装されている。
今の場合は、xlfn=xlfGetDocument なので、開いているエクセルのBookに関する情報を取得している。どんな情報を取得するかは、Excel12f()の第四引数以降で与える。
つまり、
int cdecl Excel12f(int xlfn, LPXLOPER12 pxResult, int count, ...)
のように、可変長の引数を取るので、第三引数でその引数の数を与える。
Excel12f関数の実行結果はpxResultポインターが示す場所に入る。
なので、事前に構造体を宣言しておくのだ。
XLOPER12 xResult;
pxResultには、このxResultのアドレスを指定する。
Excel12f関数の第一引数にxlfGetDocumentを指定した場合に与える第四引数一覧
Excel12f関数の第一引数にxlfGetDocumentを指定した場合に与える第四引数一覧(一部抜粋)を以下に示す。これは、冒頭で紹介した英文のXLL開発解説書から引用した物である。
| ArgNum | What the function returns |
| 4 | True if changes made to the sheet since last saved. |
| 5 | True if the sheet is read-only. |
| 6 | True if the sheet is password protected. |
| 7 | True if cells in the sheet or the series in a chart are protected. |
| 8 | True if the workbook windows are protected. (Name can be either a |
| sheet name or a workbook. If omitted the active sheet is assumed.) | |
| 9 | The first used row or 0 if the sheet is empty. (Counts from 1.) |
| 10 | The last used row or 0 if the sheet is empty. (Counts from 1.) |
| 11 | The first used column or 0 if the sheet is empty. (Counts from 1.) |
| 12 | The last used column or 0 if the sheet is empty. (Counts from 1.) |
| 13 | The number of windows that the sheet is displayed with. |
| 14 | The calculation mode: |
| 1 = Automatic | |
| 2 = Automatic except tables | |
| 3 = Manual |
引用元
Financial Applications using Excel Add-in Development in C / C++
P294 Table 8.14 Selected arguments to xlfGetDocument
と言う事で、まあ、XLLプログラミングでは、ここで紹介したようにExcel12f()関数を多用する。
そして、その実行結果を保持するための構造体 XLOPER12 xResultや、そのアドレスを表すポインタ変数LPXLOPER12 pxResultが頻繁に登場する。
まあ、そんな感じでC++のコードを書けば、目的とするXLLを作成出来るのだ。
選択域の座標情報やデータを取得するには?
上で紹介した手法を使うと、VBAのActiveSheet.UsedRange.Select コマンドに相当する機能をXLLのC++で実現出来た。
次にやりたいのは、マウスで適当に矩形選択した領域の左上座標の取得や、その領域内のセルデータの読み書きだ。
その辺りの解説は次回の記事で説明予定であるが、少しだけ説明しておこう。
選択域の座標情報を取得する方法
選択域の座標情報を取得するには、シート上のセルを適当に選択して以下のコマンドを実行してみる。
選択は単一領域でも良いし、SHIFTを押しながら選択すれば複数領域を選択する事も可能だ。
xloper12 *pRng = (xloper12*)malloc(sizeof(XLOPER12));//結果を保持する領域を確保。使い終わったらfree必要
int rc = Excel12(xlfSelection, pRng, 0); // 単一選択ならxltypeSref、複数選択ならxltypeRefが得られる。

switch (pRng->xltype){
	case xltypeSRef:		// 単一領域が選択されている場合
		・・・
		break;
	case xltypeRef:			// 複数領域が選択されている場合
		・・・
		break;
	case xltypeStr:			// 図形などは xltypeStr が帰るようだ。
		・・・
		break;
	default:			// xltypeErr の場合ここに来るがどういう場合にエラーか未確認
		・・・
		break;
}
コード 現在の選択域の行と列情報を取り出す例
その結果、xltypeの値に応じて単一領域選択、複数領域選択などが分るので、それぞれの場合に応じて次の処理を分岐すれば良い。
例えばもしxltypeがxltypeSRefの場合には、単一矩形領域が選択されているのでXLOPER12構造体の中のsref構造体に選択域の行と列の座標データが格納される。
つまり、sref構造体の中にあるメンバー変数 XLREF12 ref も以下に示す構造体になっている。
typedef struct xlref12
{
	RW rwFirst;
	RW rwLast;
	COL colFirst;
	COL colLast;
} XLREF12, *LPXLREF12;
この四つのメンバー変数で選択域の左上セルと右下セルの座標を示すのだ。
ただし、エクセルのセルは(1, 1)が原点だが、この構造体は原点位置を(0, 0) で表すのでRow、Column共に -1 をする必要がある。
もし複数領域が選択されている場合には、確か、得られる結果は、XLREF12構造体の配列になると思うが、その辺りも次回確認したい。
なお、XLOPER12構造体の中にarrayと言う構造体があるが、この構造体は、指定した矩形領域(複数選択域も可能)のセルの値を読み取る時に使う。要するに読み取ったセルデータを格納する場合に使う。
その辺りのやり方は次回の記事で解説予定だ。
疲れたので今日はこれくらいにして、伊勢海老食べよう。

写真 朝市でイセエビの味噌汁を食べる女性観光客
伊勢海老とXLLアドイン開発の関係は不明だ。
まとめ
当記事ではEXCEL SDK (2013 Office System Developer Resources) の中に入っているサンプルプロジェクトGENERIC、Frameworkを参考にして自作の関数を実行する方法を紹介した。
具体的には、EXCELのリボンに自前のメニュー、サブメニューを追加する。
それを実行して自作関数を呼び出すと言う流れだ。
今回作成した自作関数は、アクティブシートに入っているデータ域を囲む長方形領域を選択する機能を実装した。
VBAなら ActiveSheet.UsedRange.Select コマンドに相当する機能になる。
今回紹介した手法や関数は、あくまでワテが独自に作ったものなので、正統的な手法かどうかなどは良く分からない。
ワテの場合、EXCEL SDKサンプルを必死で解読して、この程度のサンプルプログラムを動かすようになるだけでも一~二ヶ月掛かった。
その間、必死でネット検索しまくったり、冒頭で紹介した英文教科書を読むなどで猛勉強したので、ワテのサンプルプログラムもそんなには間違った手法では無いと思う。
XLL開発関連の本を読む
付録のCD-ROMにあるサンプルプログラムが役立った。ワテの知る限りEXCEL XLL開発に関する参考書はこの本しか無い。
関連記事
EXCEL VSTOアドインでセル情報を取得する記事はこちら。


コメント
初めまして。
Excelアドイン・XLLの解説ありがとうございます。
試作の段階で20倍を超える高速化が出来ました。
質問なのですが、戻り値は数値で引数に文字列を当てて、XLL側で文字列を比較したいのですが、SDKサンプルには文字列に比較が無くうまく出来ず行き詰ってしまいました。
ご教示いただけますと幸いです。
引数にはwchar_t *変数名・XLOPER12・std::wstringなどを試してみました。
変数名.xltype = xltypeStr;
変数名2.val.str = L”比較したい文字列”;
if (変数名 == 変数名2){
return 関数(1);
}
西田様
この度は小生のサイトにコメントありがとうございました。
さて、XLLを使った文字列比較のご質問ですが、
「質問なのですが、戻り値は数値で引数に文字列を当てて、XLL側で文字列を比較したいのですが、」
との事ですが、XLLを使ってセルに入っている文字列を取得して、それが「比較したい文字列」と同じかどうか判定したいと言う事ですね?
XLLを使ってセルに入っている文字列を取得すると、西田様ご指摘の通り、その文字列は
変数名2.val.str
に保管されます。
この変数はXCHAR型つまりwchar_t型ですが、その中身は単なる文字列ではなくて、先頭の2バイトに文字列の長さが入っています。
また、文字列の末尾にはヌル文字はありません。
従いまして、変数名2.val.strに入っている文字列をC++で文字列比較する場合には、まずは、その先頭の2バイトを取り除いて、かつ、ヌル文字で終端して、普通のC++の文字列の形式に変換してやる必要があります。
そうすれば、あとは普通にstrcmpなどの文字列比較関数が利用できます。
あるいはwstringの文字列として扱えば、単純にイコールで比較するなども出来ます。