
Windows VPSレンタルサーバーを契約したらサイトをhttps化したい。
レンタルサーバーを契約したら、次にやりたいのは無料SSL証明書を取得してサイトをhttps化することだ。
無料SSL証明書を取得する方法は幾つかある。
その中でも手軽に利用出来るLet’s Encryptを使ってWindows VPSのサイトをhttps化したので、当記事ではその手順を紹介したい。
では本題に入ろう
wareko.netのサイトをhttps化する
ワレ子が自作した最安価格検索サイトは、現状ではSSL化(=https化)していないので下図のようにセキュリティの警告が表示される。

図 Chromeブラウザーに表示されたセキュリティ警告の例

サイトがSSL化されていない場合には、上図のように https でアクセスした場合にセキュリティの警告が出る。
Let’s Encryptを入手して実行する
Let’s Encryptの公式サイトのgithubは以下の通り。
このサイトから以下のZIPファイルをダウンロードした。
win-acme.v2.2.4.1500.x64.trimmed.zip
それを解凍すると以下のようになる。
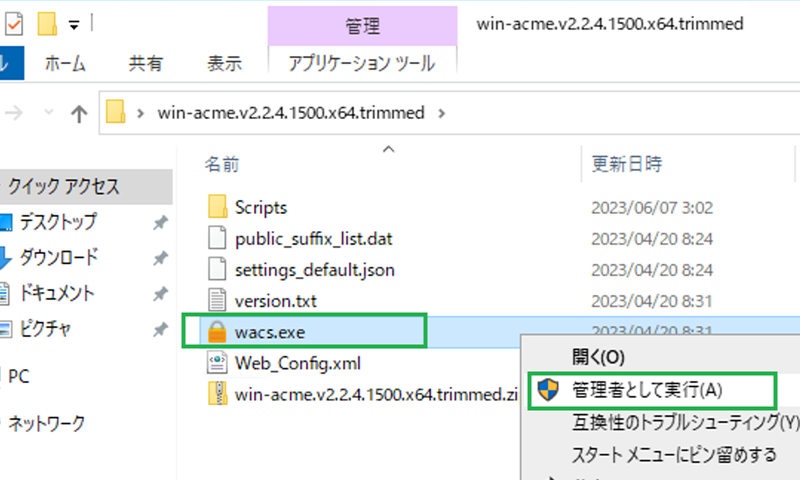
図 win-acme.v2.2.4.1500.x64.trimmed.zipを解凍した
この中の wacs.exe を実行した。念のために管理者として実行した。
なお、今回は
のドメインに対してSSL証明書を取得する。
でも実は、その前に
のサイトに対してSSL証明書を取得した。
一回目と二回目とでは殆ど同じメニューが表示されたが、後半部分で若干異なった。その辺りの違いも本文の末尾で紹介している。

A simple Windows ACMEv2 client (WACS)
Software version 2.2.4.1500 (release, trimmed, standalone, 64-bit)
Connecting to https://acme-v02.api.letsencrypt.org/...
Connection OK!
Scheduled task points to different location for .exe and/or working directory
Scheduled task exists but does not look healthy
Please report issues at https://github.com/win-acme/win-acme

N: Create certificate (default settings)
M: Create certificate (full options)
R: Run renewals (0 currently due)
A: Manage renewals (1 total)
O: More options...
Q: Quit
Please choose from the menu: m
上図において、
M: Create certificate (full options)
を選んだ。
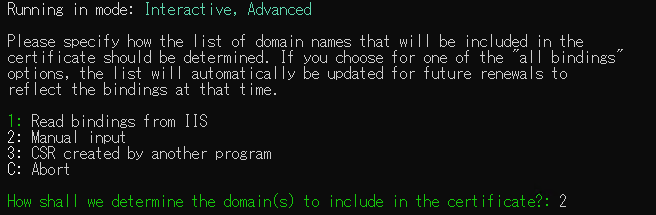
Running in mode: Interactive, Advanced

Please specify how the list of domain names that will be included in the
certificate should be determined. If you choose for one of the "all bindings"
options, the list will automatically be updated for future renewals to
reflect the bindings at that time.

1: Read bindings from IIS
2: Manual input
3: CSR created by another program
C: Abort

How shall we determine the domain(s) to include in the certificate?: 2
上図において、
2: Manual input
を選んだ。

Description: A host name to get a certificate for. This may be a
comma-separated list.

Host: www.wareko.net
Source generated using plugin Manual: www.wareko.net
Friendly name '[Manual] www.wareko.net'. <Enter> to accept or type desired name: <Enter>
上図において、Host名には
www.wareko.net
を入力してENTERを押した。
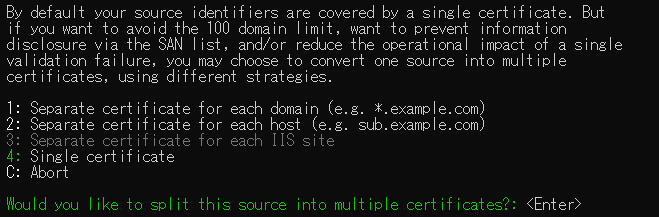
By default your source identifiers are covered by a single certificate. But
if you want to avoid the 100 domain limit, want to prevent information
disclosure via the SAN list, and/or reduce the operational impact of a single
validation failure, you may choose to convert one source into multiple
certificates, using different strategies.

1: Separate certificate for each domain (e.g. *.example.com)
2: Separate certificate for each host (e.g. sub.example.com)
3: Separate certificate for each IIS site
4: Single certificate
C: Abort

Would you like to split this source into multiple certificates?: <Enter>
上図において、
4: Single certificate
を選んだ。
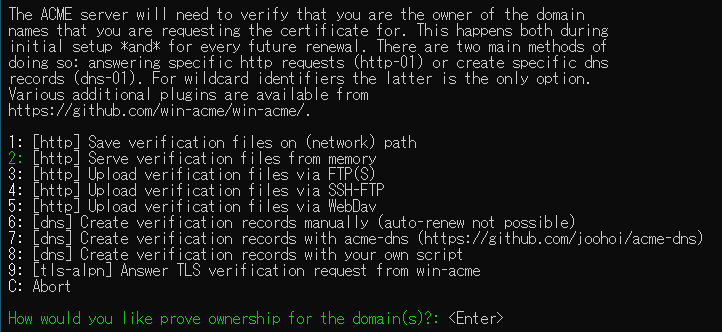
The ACME server will need to verify that you are the owner of the domain
names that you are requesting the certificate for. This happens both during
initial setup *and* for every future renewal. There are two main methods of
doing so: answering specific http requests (http-01) or create specific dns
records (dns-01). For wildcard identifiers the latter is the only option.
Various additional plugins are available from
 https://github.com/win-acme/win-acme/.

1: [http] Save verification files on (network) path
2: [http] Serve verification files from memory
3: [http] Upload verification files via FTP(S)
4: [http] Upload verification files via SSH-FTP
5: [http] Upload verification files via WebDav
6: [dns] Create verification records manually (auto-renew not possible)
7: [dns] Create verification records with acme-dns (https://github.com/joohoi/acme-dns)
8: [dns] Create verification records with your own script
9: [tls-alpn] Answer TLS verification request from win-acme
C: Abort

How would you like prove ownership for the domain(s)?: <Enter>
上図において、
2: [http] Serve verification files from memory
を選んだ。
この辺りの意味は私自身、良く理解していない。
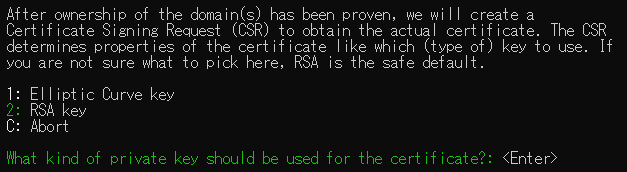
After ownership of the domain(s) has been proven, we will create a
Certificate Signing Request (CSR) to obtain the actual certificate. The CSR
determines properties of the certificate like which (type of) key to use. If
you are not sure what to pick here, RSA is the safe default.

1: Elliptic Curve key
2: RSA key
C: Abort

What kind of private key should be used for the certificate?: <Enter>
上図において、
2: RSA key
を選んだ。
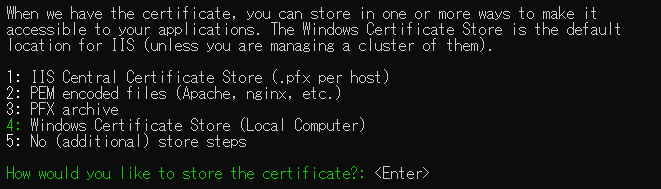
When we have the certificate, you can store in one or more ways to make it
accessible to your applications. The Windows Certificate Store is the default
location for IIS (unless you are managing a cluster of them).

1: IIS Central Certificate Store (.pfx per host)
2: PEM encoded files (Apache, nginx, etc.)
3: PFX archive
4: Windows Certificate Store (Local Computer)
5: No (additional) store steps

How would you like to store the certificate?: <Enter>
上図において、
4: Windows Certificate Store (Local Computer)
を選んだ。

1: [WebHosting] - Dedicated store for IIS
2: [My] - General computer store (for Exchange/RDS)
3: [Default] - Use global default, currently WebHosting

Choose store to use, or type the name of another unlisted store: <Enter>
上図において、
3: [Default] – Use global default, currently WebHosting
を選んだ。
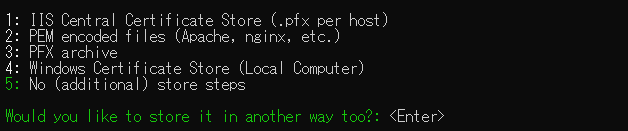
1: IIS Central Certificate Store (.pfx per host)
2: PEM encoded files (Apache, nginx, etc.)
3: PFX archive
4: Windows Certificate Store (Local Computer)
5: No (additional) store steps

Would you like to store it in another way too?: <Enter>
上図において、
5: No (additional) store steps
を選んだ。
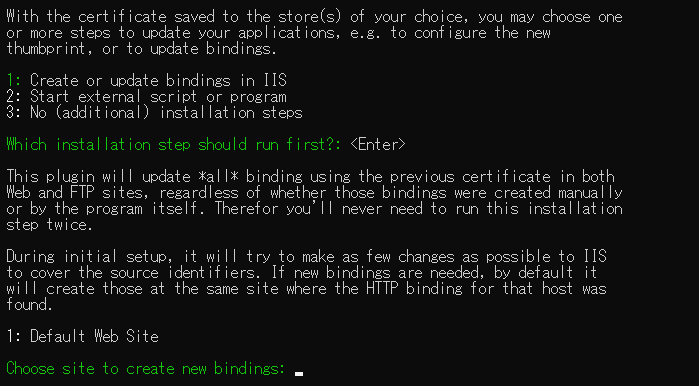
With the certificate saved to the store(s) of your choice, you may choose one
or more steps to update your applications, e.g. to configure the new
thumbprint, or to update bindings.

1: Create or update bindings in IIS
2: Start external script or program
3: No (additional) installation steps

Which installation step should run first?: <Enter>

This plugin will update *all* binding using the previous certificate in both
Web and FTP sites, regardless of whether those bindings were created manually
or by the program itself. Therefor you'll never need to run this installation
step twice.

During initial setup, it will try to make as few changes as possible to IIS
to cover the source identifiers. If new bindings are needed, by default it
will create those at the same site where the HTTP binding for that host was
found.

1: Default Web Site

Choose site to create new bindings:
上図において、
1: Create or update bindings in IIS
を選んだ。
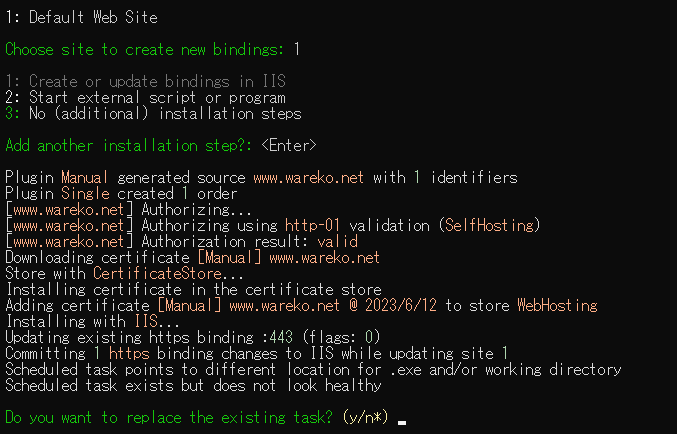
1: Default Web Site

Choose site to create new bindings: 1

1: Create or update bindings in IIS
2: Start external script or program
3: No (additional) installation steps

Add another installation step?: <Enter>

Plugin Manual generated source www.wareko.net with 1 identifiers
Plugin Single created 1 order
[www.wareko.net] Authorizing...
[www.wareko.net] Authorizing using http-01 validation (SelfHosting)
[www.wareko.net] Authorization result: valid
Downloading certificate [Manual] www.wareko.net
Store with CertificateStore...
Installing certificate in the certificate store
Adding certificate [Manual] www.wareko.net @ 2023/6/12 to store WebHosting
Installing with IIS...
Updating existing https binding :443 (flags: 0)
Committing 1 https binding changes to IIS while updating site 1
Scheduled task points to different location for .exe and/or working directory
Scheduled task exists but does not look healthy

Do you want to replace the existing task? (y/n*)
上図において
1: Default Web Site
を選んだら、処理が開始して十数行に渡ってメッセージが表示された。
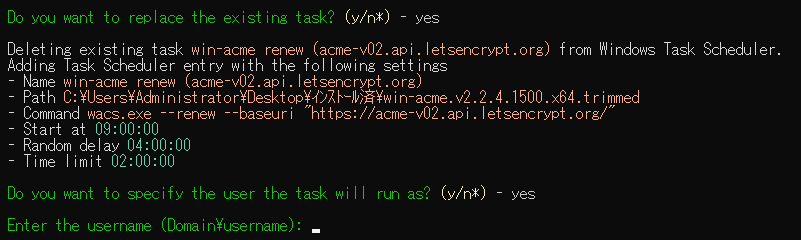
Do you want to replace the existing task? (y/n*) - yes

Deleting existing task win-acme renew (acme-v02.api.letsencrypt.org) from Windows Task Scheduler.
Adding Task Scheduler entry with the following settings
- Name win-acme renew (acme-v02.api.letsencrypt.org)
- Path C:\Users\Administrator\Desktop\インストール済\win-acme.v2.2.4.1500.x64.trimmed
- Command wacs.exe --renew --baseuri "https://acme-v02.api.letsencrypt.org/"
- Start at 09:00:00
- Random delay 04:00:00
- Time limit 02:00:00
Do you want to specify the user the task will run as? (y/n*) - yes
Enter the username (Domain\username):
上図においてyesを二回実行した。
Do you want to specify the user the task will run as? (y/n*) - yes
Enter the username (Domain\username): Administrator
Enter the user's password: ********************************
Adding renewal for [Manual] www.wareko.net
Next renewal due after 2023/8/5
Certificate [Manual] www.wareko.net created

N: Create certificate (default settings)
M: Create certificate (full options)
R: Run renewals (0 currently due)
A: Manage renewals (1 total)
O: More options...
Q: Quit

Please choose from the menu: q
上図では管理者のユーザー名とパスワードが求められたのでWindowsの管理者名とパスワードを入力した。
その結果、
Certificate [Manual] www.wareko.net created
と表示されて無事に www.wareko.net のサイトをSSL化出来たようだ。
これらの処理が無事に完了すると、WindowsのスケジューラーにSSL証明書の自動更新のタスクが書き込まれる。その結果、あとは何もしなくても自動でSSL証明書が更新される。
なお、www.wareko.netに対して上のSSL化の処理を行う前に、wareko.netに対してSSL化の処理を行った。
その時には、下図のようにメールアドレスも要求された。
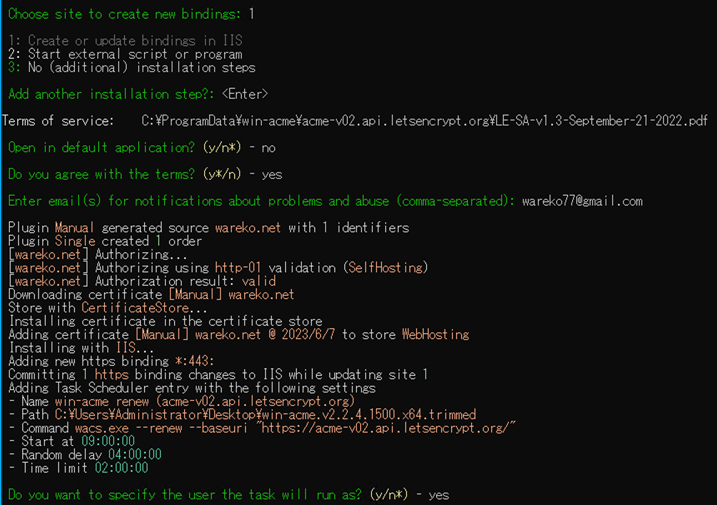
Choose site to create new bindings: 1

1: Create or update bindings in IIS
2: Start external script or program
3: No (additional) installation steps

Add another installation step?: <Enter>

Terms of service: C:\ProgramData\win-acme\acme-v02.api.letsencrypt.org\LE-SA-v1.3-September-21-2022.pdf
Open in default application? (y/n*) - no
Do you agree with the terms? (y*/n) - yes
Enter email(s) for notifications about problems and abuse (comma-separated): wareko77@gmail.com

Plugin Manual generated source wareko.net with 1 identifiers
Plugin Single created 1 order
[wareko.net] Authorizing...
[wareko.net] Authorizing using http-01 validation (SelfHosting)
[wareko.net] Authorization result: valid
Downloading certificate [Manual] wareko.net
Store with CertificateStore...
Installing certificate in the certificate store
Adding certificate [Manual] wareko.net @ 2023/6/7 to store WebHosting
Installing with IIS...
Adding new https binding *:443:
Committing 1 https binding changes to IIS while updating site 1
Adding Task Scheduler entry with the following settings
- Name win-acme renew (acme-v02.api.letsencrypt.org)
- Path C:\Users\Administrator\Desktop\win-acme.v2.2.4.1500.x64.trimmed
- Command wacs.exe --renew --baseuri "https://acme-v02.api.letsencrypt.org/"
- Start at 09:00:00
- Random delay 04:00:00
- Time limit 02:00:00
Do you want to specify the user the task will run as? (y/n*) - yes
という事で、無事に
wareko.net
www.wareko.net
の2つのドメインに対してSSL化をすることが出来た。
実際、下図のように🔏アイコンが表示されているのが分かる。
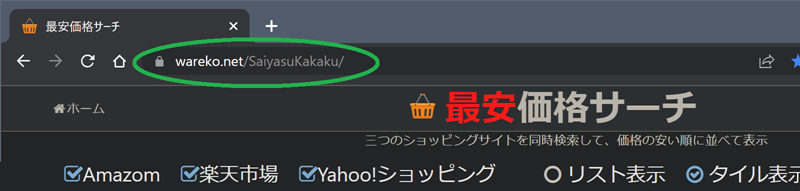
図 Chromeブラウザーで開いた wareko.netのサイト
そのサイトをEdgeで開いてみた(下図)。
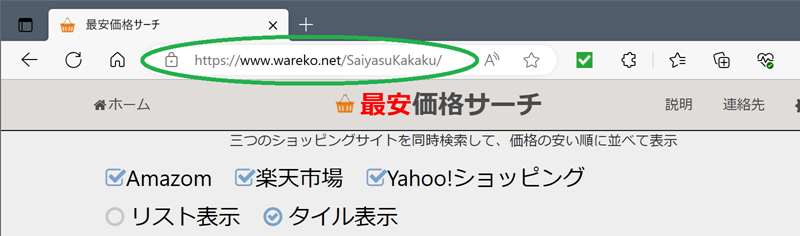
図 Edgeブラウザーで開いた wareko.netのサイト
Edgeでも🔏アイコンが表示されているのが分かる。
なお、Chromeの場合には、
を開くと自動的に
が開くが、Edgeの場合にはそうない。
その理由は分からない。
まとめ
Let’s Encryptを使うとWindows VPSやLinux VPSのサイトを簡単にSSL化出来る。
当記事では無料のSSL証明書発行ツールであるLet’s Encryptを使って、Windows VPSのサイトをSSL化(=https化)する手順を紹介した。
SSL化の方法は幾つかあるが、Let’s Encryptはお手軽で無料なのでお勧めしたい。
(続く)


コメント